My poor husband has been dealing with my jewelry all over my new dresser (which is beautiful), since leaving the jewelry tower I had used for a long time. But in my head was an idea that I had been tinkering with FOREVER. I even had most of the supplies on hand, but I was waiting for a frame to present itself, either on a thrift store hunt, or a mega sale or recycling an old painting or print. Enter Hobby Lobby.
While setting up my new class (woodburning and decoupage), I was wandering through, and noticed 50% off of frames. And I LOVED the design of this one. It was very sturdy, and just the right color- metallic- but not quite gold, not quite silver. It was just the sparkle my monochromatic, sleep inducing master bedroom needed. So I scooped it up for about $17.
My new Hanging Frame Jewelry Holder Project was underway!!!
What you need:
Open frame, hot glue, hot glue gun, some screening, glass pebbles (found in the floral section, which have been in my studio awaiting some use for years..) Truth to tell, I don't know how I ended up with the roll of screening I have, but I think it is fairly easy to come by, even in the hardware store, for people who need to repair door screens.
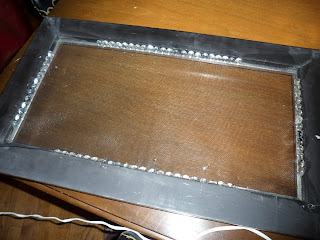
Step One: Cut the screen wider than the opening of the frame, by about 1 inch. Take your hot glue and 4 pebbles and stretch the screen, fastening the points directly across from one another, in the middle.
Pay no attention to the hideous (lack of) manicure. :)
Step Two: Once you have the anchor points established, work your way to the corners, adding to each side of the anchor, and rotating sides to give a more or less even tension.
The pebbles are serving as a decorative element (looking a lot better than staples), but also are really doing all the work, so make sure you add plenty of glue to the top and bottom edge and sandwich it in there really well.
Step Three: Don't worry if they don't seem to fit, in the corners, you can leave small spaces and fill in with glue, if necessary. Mine happened to work out pretty well.
Step Four: Trim the excess with regular scissors (wow that word looks weird). This will be an opportunity to check and see if you have any loose pebbles and add some more glue.
Step Five: If you're like me, you need someplace to put earrings that clasp together and bracelets and necklaces. I added a hardware element, that was as simple as 1,2,3!
Using an eye hook and picture wire, I found a spot in the frame on the front and just twisted. (If you need extra leverage, a nail will do the job well!) I did the same on the long end of the opposite side. Then I strung the wire, and twisted the ends. Voila!!
I also chose a perfect color, so that the picture wire could just blend right in. If you use a dark frame, you could use a permanent marker to color it, or use electrical wire or something else. Be creative. I didn't want mine to compete with the super cool frame.
I added hanging hardware to the back--
And ended up with this!
Into organization and art! (Bonus: I keep earrings that people give me- if you identify a pair of earrings that looks familiar, comment and share a memory!) The rest are ones that I've made, and some that are from my honeymoon. The heavier necklaces I hung directly from the eye hooks. I love my new organizer! (My husband will, too).


There are many ways to go about organizing your accessory. Different methods make more sense depending on your space and what you’re storing. No matter which method you choose, these accessory organizer definitely helps you to reduce the space usage. Once again great post man! Cheers!
ReplyDelete