Tuesday, April 3, 2012

How to Make a Hanging Jewelry Organizer


My poor husband has been dealing with my jewelry all over my new dresser (which is beautiful), since leaving the jewelry tower I had used for a long time. But in my head was an idea that I had been tinkering with FOREVER. I even had most of the supplies on hand, but I was waiting for a frame to present itself, either on a thrift store hunt, or a mega sale or recycling an old painting or print. Enter Hobby Lobby.


While setting up my new class (woodburning and decoupage), I was wandering through, and noticed 50% off of frames. And I LOVED the design of this one. It was very sturdy, and just the right color- metallic- but not quite gold, not quite silver. It was just the sparkle my monochromatic, sleep inducing master bedroom needed. So I scooped it up for about $17.


My new Hanging Frame Jewelry Holder Project was underway!!!

What you need:

Open frame, hot glue, hot glue gun, some screening, glass pebbles (found in the floral section, which have been in my studio awaiting some use for years..) Truth to tell, I don't know how I ended up with the roll of screening I have, but I think it is fairly easy to come by, even in the hardware store, for people who need to repair door screens.


Step One: Cut the screen wider than the opening of the frame, by about 1 inch. Take your hot glue and 4 pebbles and stretch the screen, fastening the points directly across from one another, in the middle.


Pay no attention to the hideous (lack of) manicure. :)


Step Two: Once you have the anchor points established, work your way to the corners, adding to each side of the anchor, and rotating sides to give a more or less even tension.


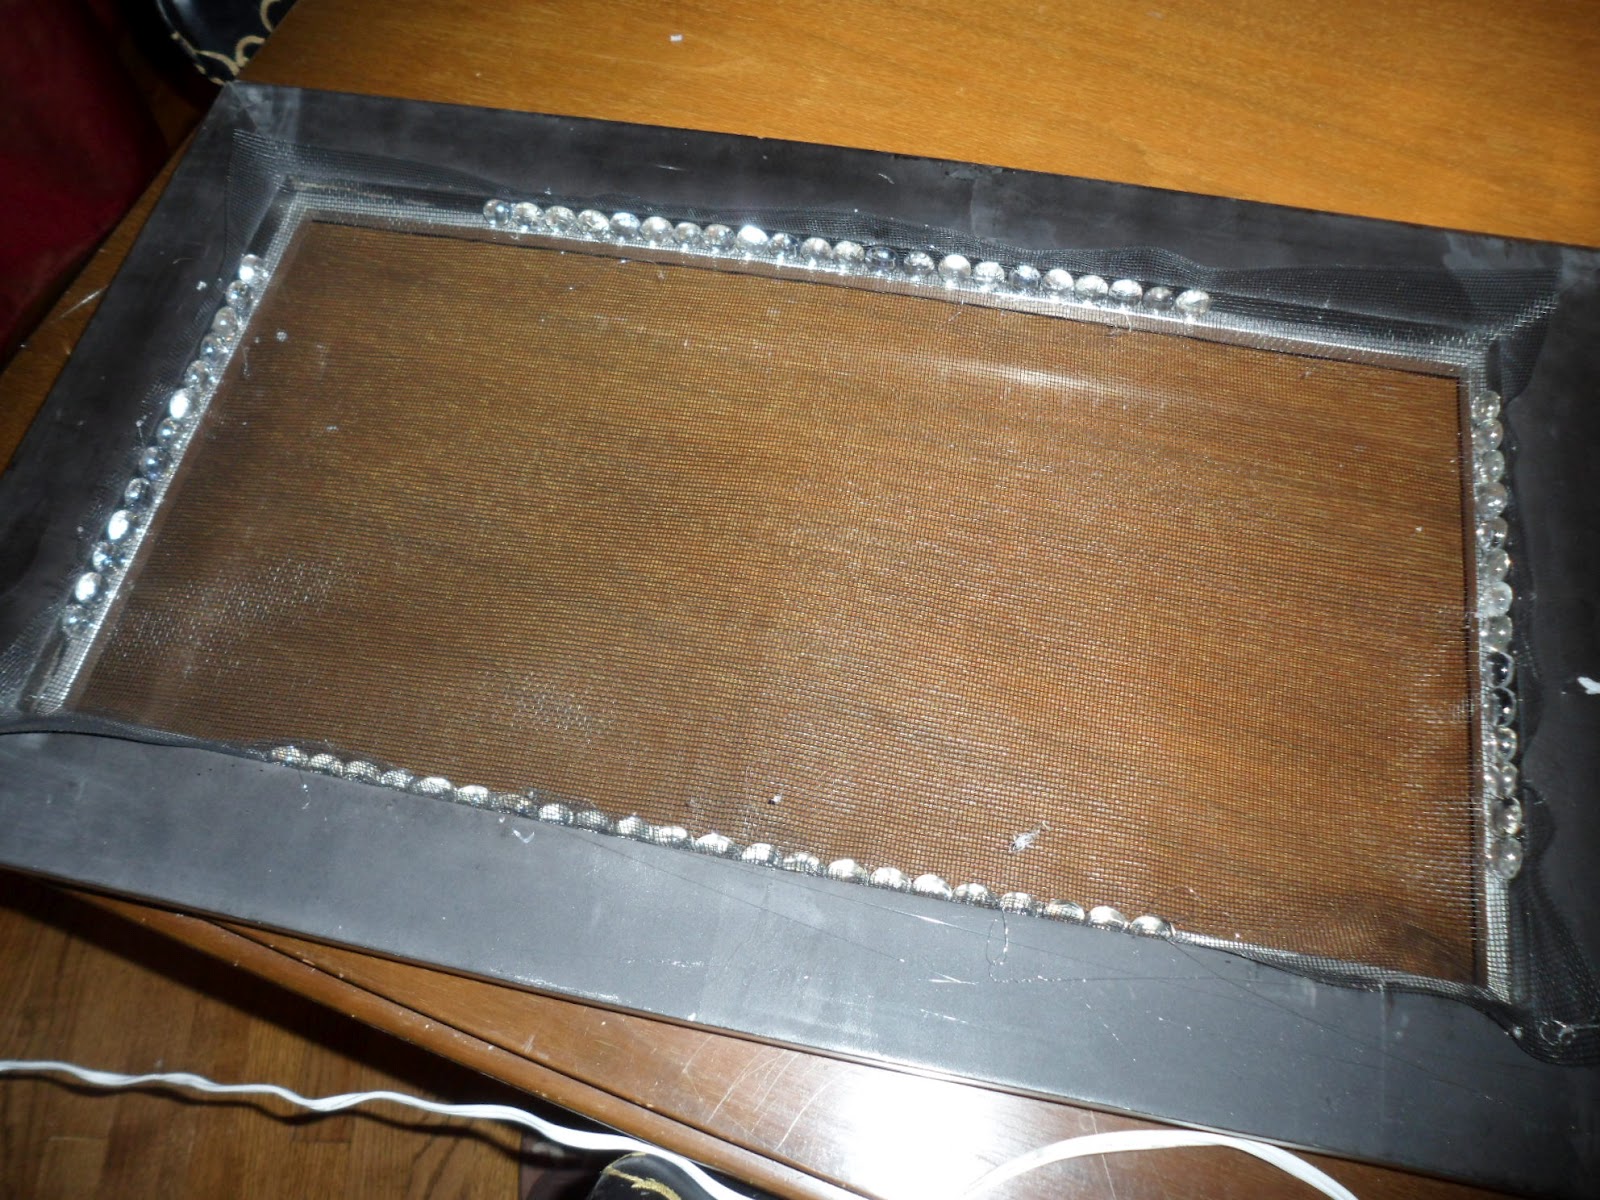
The pebbles are serving as a decorative element (looking a lot better than staples), but also are really doing all the work, so make sure you add plenty of glue to the top and bottom edge and sandwich it in there really well.


Step Three: Don't worry if they don't seem to fit, in the corners, you can leave small spaces and fill in with glue, if necessary. Mine happened to work out pretty well.


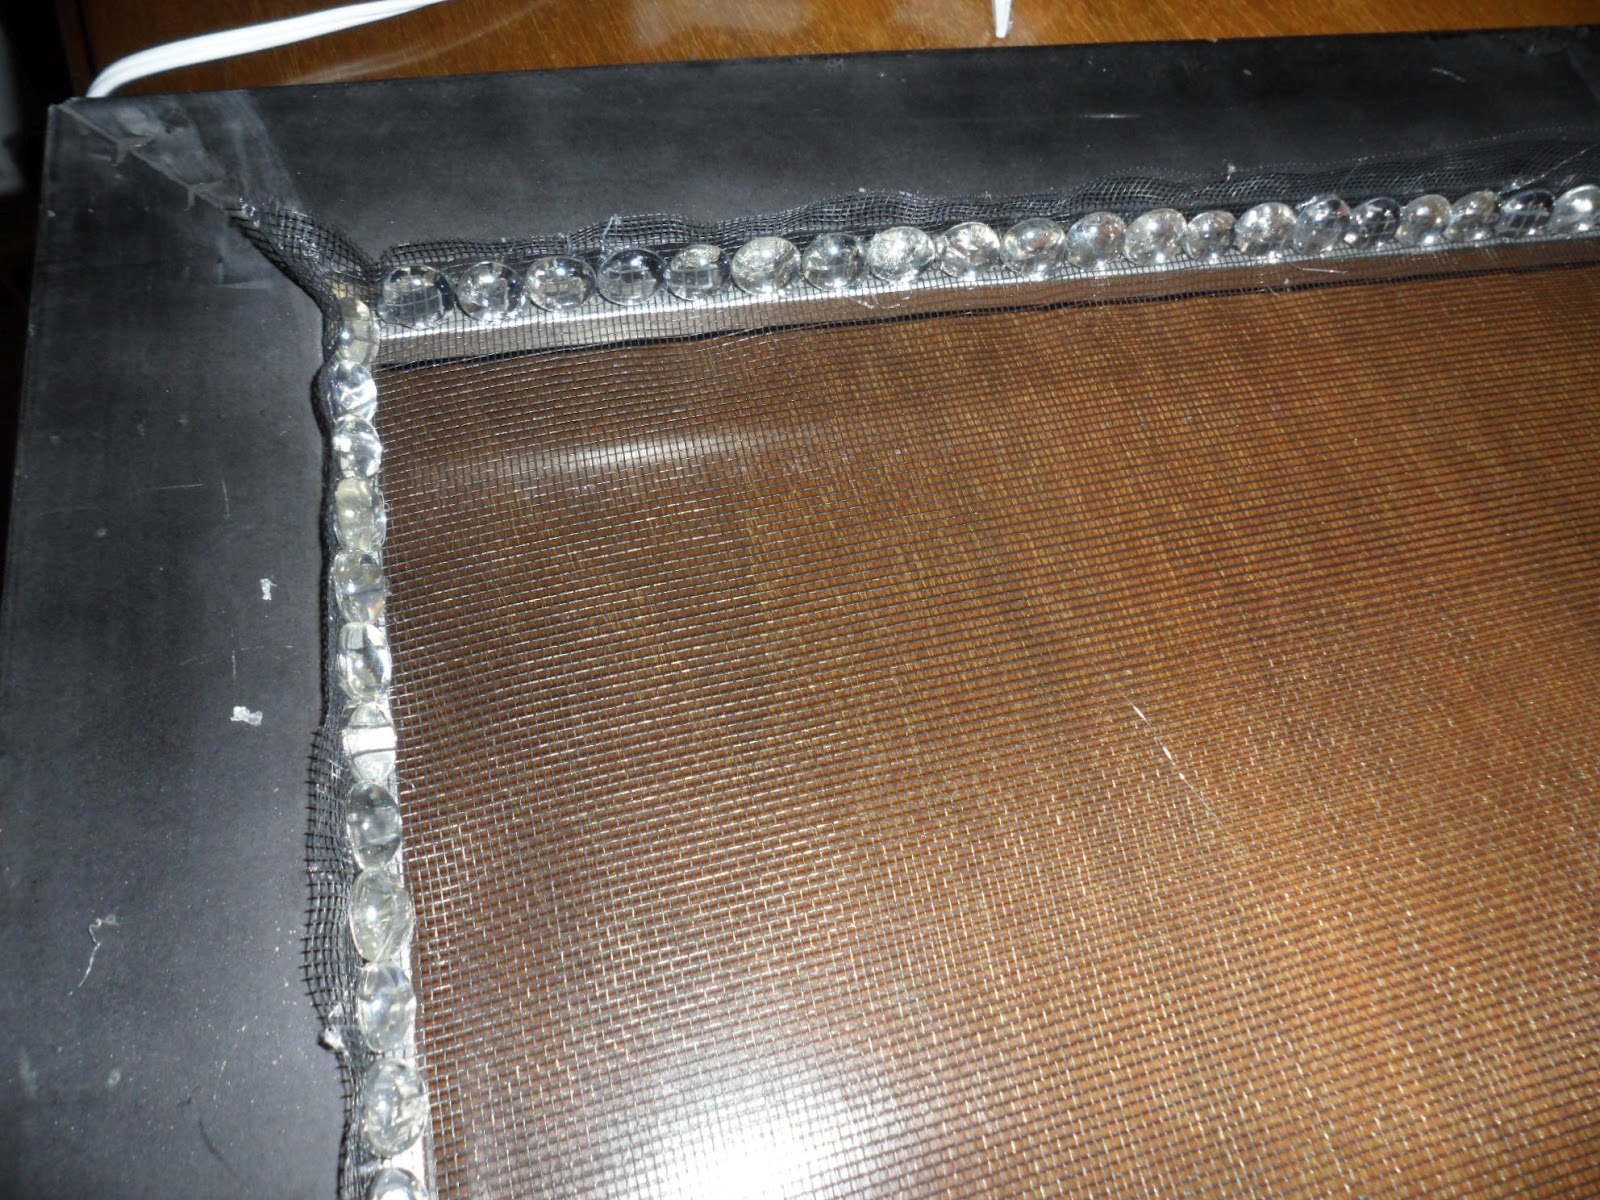
Step Four: Trim the excess with regular scissors (wow that word looks weird). This will be an opportunity to check and see if you have any loose pebbles and add some more glue.


Step Five: If you're like me, you need someplace to put earrings that clasp together and bracelets and necklaces. I added a hardware element, that was as simple as 1,2,3!
Using an eye hook and picture wire, I found a spot in the frame on the front and just twisted. (If you need extra leverage, a nail will do the job well!) I did the same on the long end of the opposite side. Then I strung the wire, and twisted the ends. Voila!!

I also chose a perfect color, so that the picture wire could just blend right in. If you use a dark frame, you could use a permanent marker to color it, or use electrical wire or something else. Be creative. I didn't want mine to compete with the super cool frame.

I added hanging hardware to the back--


And ended up with this!

Turning this clutter-


Into organization and art!  (Bonus: I keep earrings that people give me- if you identify a pair of earrings that looks familiar, comment and share a memory!) The rest are ones that I've made, and some that are from my honeymoon. The heavier necklaces I hung directly from the eye hooks. I love my new organizer! (My husband will, too).

Monday, April 2, 2012

I'm really excited because my class schedule came out-- Teaching at a local craft store in Richmond, that I love, Hobby Lobby!
4/10- 2-3:30pm
4/12- 2-3:30pm
4/14- 11am-12pm
4/24 2-3:30pm
4/26 2-3:30pm
4/28 11am-12pm.

We will be learning wood burning and decoupage. You are responsible to bring a wooden item, paper, pencil, art eraser and Mod Podge!
I will provide wood burners, spray varnish, mats and cutting tools.

Tuesday, February 14, 2012

Valentine's Day Love

Hoping that everyone has an unbelievably blessed Valentine's Day!
These were my wedding vows, based on 1 Corinthians 13. I hope to live up to them each day of my marriage, and be a woman who honors the Lord in all that she does...

                 "My promise is to let the Love that I have in
 my heart for you this day, grow increasingly more into God's precious
 standard of love. I promise to be patient with you and kind to you. I
 promise to not envy or compete with you or puff myself up in pride over the
 love we share. I promise to not be rude or self-seeking or easily
 angered--*making our home together a safe place for you from the demands of
 your day and the harshness of the world*. I promise to keep no record of
 wrongs, to accept apologies, whether given or not. I promise to be happier
 with a difficult truth, and rejoice in it, than an easy lie that is
 flattering. My love will always protect you, always trust you, always
 believe in you and hope for the best. My love for you will last beyond us.
 It will never give out and it will never fail you."

Aaron's were the same, except he said *"making our home together a safe place where you feel protected, desired and cared for."

Marriage is a blessing that we, having waited ten years to be together, hope to not take for granted. I am giving Aaron a copy of these vows, framed, for our very first Valentine's Day together. It will be proudly displayed in our house as a reminder of what God's Word says about love. He is the AUTHOR of love and the best lover of all time, in that He gave us the ultimate gift, Jesus Christ.

"Snack"- It's What's for Dinner

There are many nights where cooking escapes me, for whatever reason- big lunch, working on other projects, not wanting to heat the house up.... Having a laid back husband, in that case, works out swimmingly. We have developed, early in our dating life, a meal we call "snack" for dinner. It was born out of the days when he used to come and visit me, on his leave from Afghanistan,  arriving at different times of day that weren't necessarily meal times, and he needed 'a little something' to get him to the next meal. I always have certain things on hand- fresh fruits and veggies, but I also have crackers and a hearty dip, be it hummus, or home-made bean dip.
This last addition to the "snack" repetoire included greek yogurt dip, turkey slices, Mary's Gone Gluten free crackers, carrots, celery, red pepper,pears, apples, oranges and cucumbers. It's mostly organic (except things that get pealed anyway) but storebought. I CAN'T WAIT until we have snack this summer, and it is from our very own garden... baby steps.
I think the secret to the success of this meal is abundance and visual presentation. there is absolutely no guilt eating any of this. And cutting up one of each thing, makes it very affordable. I always arrange it on a pretty platter, like the feast that it is. They say you eat with your eyes first, so I like to be conscious of the colors. This could work with a great cold quinoa salad, or bean dip, or anything you have on hand that can be served cold or at room temp. Next time you feel like you only have time to chop- make "snack" for dinner. It's a satisfying way to end the day! (Just make sure you don't wreck it with a huge ice cream sunday later!) But if you do... hey, you've saved the calories where you could! :)

Friday, February 3, 2012

New Schedule, New Year, New Life

So.. it didn't take long for me to figure out that I am not disciplined enough to be productive in my new 'stay at home life' unless I have a plan.
Last week, I downloaded a couple of things that have helped me tremendously. One was a meal planning form. The other was a month at a glance calendar, that was accompanied by a daily schedule.
I sat down and was honest about what needed to be done around this house.
Now, you should know that I am NOT one of those women who LOVES to clean her house, and gets a perverse satisfaction from everything being perfect and in its place. I'm an artist. And though I can't work in the chaos that I have seen tolerated in the spaces of other artists, I am not OCD about mess. I have my breaking points, though. It will usually take a few days of looking at a mess, before I break down and DO something about it. But I decided that it is less stressful to live everyday ready for someone to drop in (instead of praying that they don't go to the bathroom) and to be hospitable, than to wait until someone is coming to visit and stress out, becoming a whirling dervish of clean and order. No thanks.
So this phase of life is about working smarter, not harder.
Plus I have a fledgling business I'll be getting off the ground shortly, and the shop I already have on etsy needs stocking, so I've been hard at work creating. I apparently need to be able to "see" that I have time to fit in everything that I need to do, and that it all works-- stuff for mind, body and soul.
Here's the basic breakdown:
6:15 is gym time with the hubby. Yuck. I will never like this, but have determined it needs to be first to get it over with.
7:30-9:00 I fix Aaron's lunch (yes, I do:)) and get any prep for dinner done. This will only help me later, when it is time call it quits in the studio for the day.
9:00-9:30 is time with the Lord. Bible reading. Worship music. Prayer.
9:30-12:00 House Stuff!! On Mondays I do our bedroom and the laundry. Tues- I do the downstairs floors. Vaccuuming, sweeping or whatever with any of the guest rooms that need anything. Wed is deep kitchen cleaning day- floors mopped and deeper cleaning than nightly straighten up. Thurs. I am off, since it is Bible Study morning with the ladies of Hope. Friday is the WORST. Bathroom cleaning day. Boo. But it helps to go into the weekend with it all done, and I think it will add to my overall peace.
12-1pm is lunch and What Not to Wear (my indulgence)
1-5pm is studio time. Sometimes I forsake other things I may need to do (like if the laundry is all caught up) and work all day. Or go shopping for supplies.
5pm is time to start dinner. Even though Aaron doesn't get home till 6:30, it helps to change gears and get ready.
Friday is date night, so I don't work in the studio much, in the afternoon. I do grocery shop then. It is nice at the grocery store around 2pm.
I find that having the schedule, even if I don't follow it to the letter, helps me so much. It lets me not feel overwhelmed or like I have to "clean the house" all the time. By doing it in bite sized pieces, it keeps everything moving.
I love things that make life easier. And I have to say- I think I'm feeling more from the bathroom cleaning than from this morning's work out. I am going to mess around in the studio and get ready for my date!

Tuesday, January 24, 2012

Artist Studio Makeover-One Man's "Oops" Paint is Another Man's Perfect Color


My husband bought the house, in the summer, before our wedding in November. "My studio" was a woodshop. The guy had tons of equiptment, and once it was all gone, it seemed like it could totally work... I began the "please, please, please" process that ended with my husband saying that I could have the space. It was electrified, sort of. The previous owner had an extension cord running out to the space.
During our intitial renovation phase, the hub had it REALLY electrified. Line buried, light switches and everything. We have done absolutely nothing with the space since then. All of my art supplies went in, and it was basically storage.
Starting my new bridal accessories business, it had become obvious with my stuff all over the house, that I need to get the space usable. So, over the weekend, we went to Lowes, got new light bulbs for the overhead flourescents (boo) and yes, we found OOOps paint in just the right shade!
In case you don't know what oops paint is, there is a section in the paint department that has paint, mixed that the customer decided they didn't want. I have found this is an AMAZING way to save money for DIY projects. Most of the time I have a 'general' color in mind, but nothing super specific, and I knew I wanted orange. We've done one room in the house an orange that is very different, more pumpkin/saffron color. This is Campbell's Tomato soup orange. Love it! I couldn't WAIT to get started today....
But there was so much cleaning! Years of being a wood shop made my shop vac work over time. I had to sweep walls! But at last, after the terrible job of painting the ceiling twice, I got to play with the color. And let me say, that even though the space is roughly finished (no baseboards, window unframed, rough patched drywall) the paint did remarkably well. It was Valspar's Ultimate Hide formula. I have painted many years, and never had a red or orange that looked this good in one coat!
Tomorrow, the fun parts of organizing, painting some bookshelves, painting some lamps, organizing...the floor is rough plywood, and my plan is to stain it and seal it so the grain comes through. If that doesn't work, maybe I'll get some peel-n- stick tile. I love resourcefulness. :)

Tuesday, January 17, 2012

Flushing Out the Old!!

Saying goodbye to carbs for a while!
Came across this 'fat flush' plan for 3 days and my dear hubby is willing to try it, too. Getting back to 'pre honeymoon, pre-holiday' weight in short order. The plan looks easy, and it is only three days. I figure we can do anything for 3 days.
The plan is to have one of a few breakfasts- 2 hard boiled eggs and half a grapefruit, or a two egg plus 1/2 c. veggie omelet, or 1 1/2 c. greek yogurt with 1 1/2 c. berries. Then the soup comes into play.
The Soup is
1 3/4 c. lean ground beef turkey or chopped chicken
1 tsp. olive oil
1 large onion peeled and chopped
1 large red, yellow or green pepper seeded and chopped
1 large yellow squash chopped
4 cloves chopped garlic
1 bottle reduced sodium tomato or veggie cocktail juice (46 oz)
1 can pinto, garbanzo or black beans, rinsed and drained
1 can crushed tomatoes
1 Tbs. lime juice
1 Tbs ground cumin
1/8 tsp cayenne pepper
1/2 c. each fresh cilantro and parsley
1/2c. grated daikon (japanese radish)
1 small peeled and chopped eggplant
1 tsp turmeric
*the basic soup is everything except the last three ingredients. The last three ingredients you are to add for carb cravings/GI distress and bloat, headaches and colds. This is all from for Women First magazine, but the original is the fatflush diet.
We will see. Starting tomorrow. I will post pics and results.

Thursday, January 12, 2012

New Year- New Life

wow! I can't believe it has been so long. I remember my last post... how excited I was to share it with a certain friend of mine who was in Afghanistan at the time. That thought ripped through me until it was dissected in an intelligible way. And I couldn't wait to share it. Once he heard it, he encouraged me to write it. That friend is now my husband!
I live in a different city, with a fantastic husband that I've known trusted and loved as a friend for 10 years. I have a studio, and finally the freedom to do my 'side business' full time. So that is what I am going to do.
The shop is back up- designs by Gina- selling the stuff I've sold previously.. but a new shop is in the wings that will be all things bridal. It is called "The Peacock Princess" which is a nod to my maiden name which means peacock in Italian. It seems that doing creative things for my wedding unlocked a whole new avenue of things I want to do to make the bridal experience a little easier- but still handmade! When I saw what was out there- and how expensive it was, I knew that it didn't have to be that way. It will be interesting to so how things evolve.
I am adjusting to the new normal- and I'm looking forward to all the wonderful things 2012 will bring! I hope you are too!

New designs!!!

New designs!!!
click to go to my Etsy shop!

EMAIL ME!!!